
61736
|
The public account follows "The Wonderful World of Linux"」 Set it as a "star" and let you play Linux every day! 
In this article, you will learn how to use Devtron for application development on K8S in a multi-cluster environment.
Devtron comes with tools for building, deploying, and managing microservices. It simplifies deployment on K8S by providing an intuitive UI and Helm chart support. Today we'll run a sample Spring Boot application using a custom Helm chart. Deploy it in different namespaces across multiple K8S clusters. The sample application connects to the database, which is running on K8S and has been deployed using Devtron Helm charts. Install Devtron on K8SThe first step is to install Devtron on K8S. There are two installation options: with CI/CD module or without it. This article will not build a CI/CD process, but there are some important features included in this module. First, add the Devtron Helm repository: $ helm repo add devtron https://helm.devtron.aiThen, execute the following Helm command: $ helm install devtron devtron/devtron-operator \See the Devtron documentation for detailed installation instructions.
Use Kind to create a second K8S clusterTo prepare a multi-cluster environment on the local machine, we will use Kind to create a second K8S cluster c1 by executing the following command:
$ kind create cluster --name c1 The context of the second cluster is: kind-c1. After a Kind cluster is created, it becomes the default context. 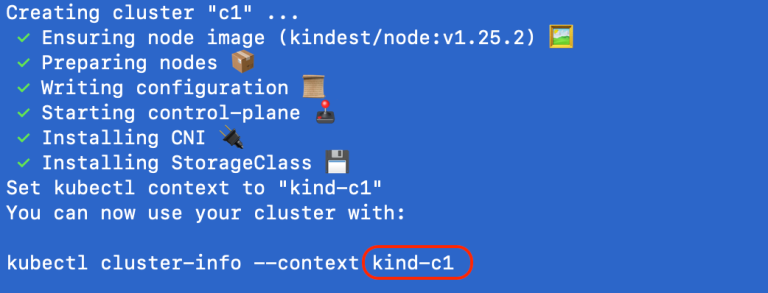 Now, our goal is to add the newly created Kind cluster as a managed cluster for Devtron. One Devtron instance can manage multiple K8S clusters. Of course, by default, it only manages a local cluster. Before we add the Kind cluster to the Devtron dashboard, we should first configure permissions on the cluster. The following script will generate a bearer tokenFor authentication so Devtron can communicate with the target cluster:$ curl -O https://raw.githubusercontent.com/devtron-labs/utilities/main/kubeconfig-exporter/kubernetes_export_sa.sh && bash kubernetes_export_sa.sh cd-user devtroncd https://raw.githubusercontent.com/devtron-labs/utilities/main/kubeconfig-exporter/clusterrole.yaml bearer tokenPrint in the output of this command, copy it.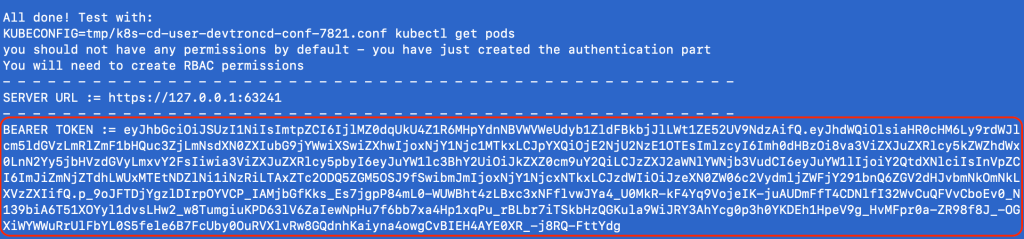 We must also provide the URL of the master API of the target cluster. Since I'm running K8S on Kind, I need to get the internal address of the Docker container containing Kind. In order to get it we need to run the following command: $ docker inspect -f '{{range.NetworkSettings.Networks}}{{.IPAddress}}{{end}}' c1-control-plane Here are the IP addresses of my Kind cluster:  Now we have all the data we need to add a new managed cluster in the Devtron dashboard. To do this, navigate to Global Configurationpart. then select Clusters and Environmentsitem and clickAdd clusterbutton. You need to fill in the Kind cluster URL and the previously generated bearer token。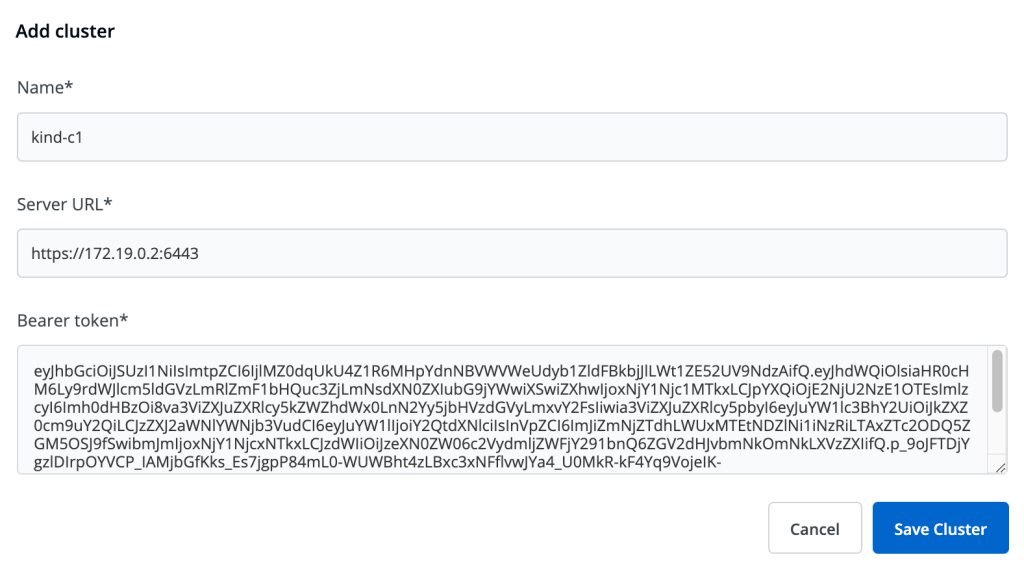 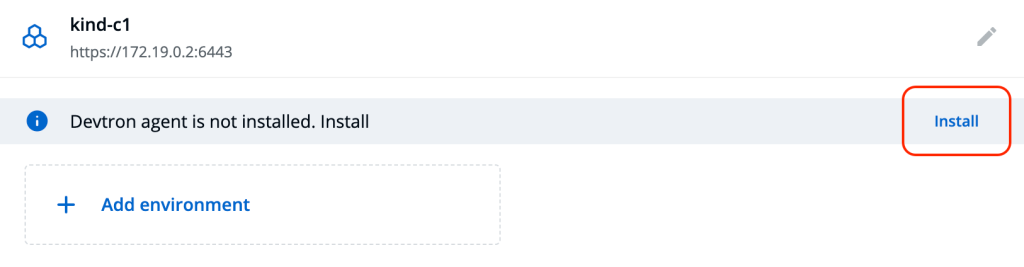 Create environmentWe will define three environments. Assigned to a cluster in a Devtron environment. We will create an environment on the local cluster ( local ), and two other Kind clusters ( remote-dev, remote-devqa). Each environment has a target namespace. For simplicity, the name of the namespace is the same as the environment name. Of course, you can set any name you want. 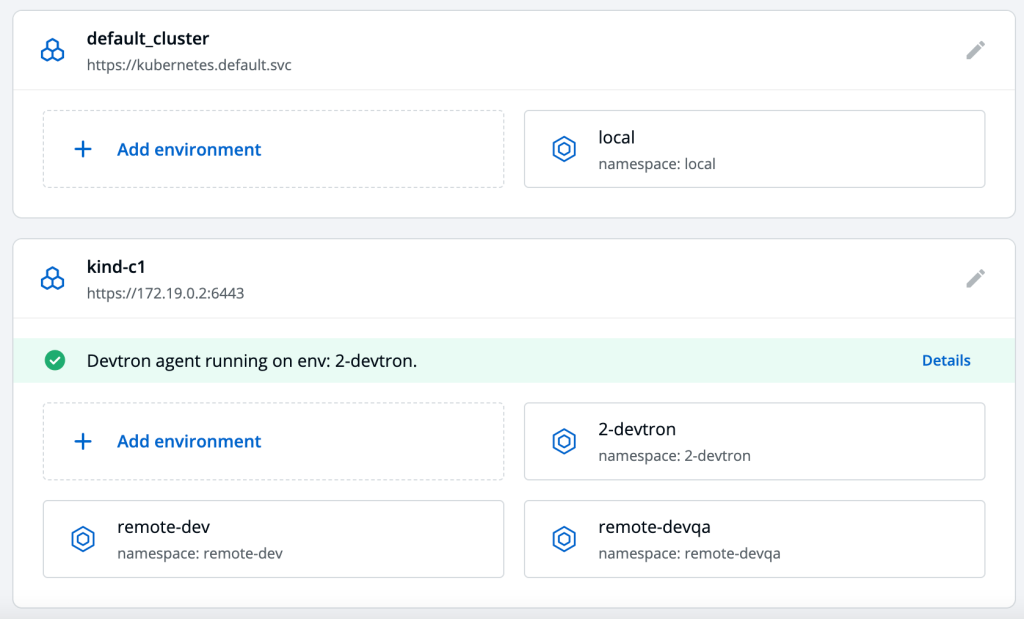 Now, switch to Clustersview. As you can see, there are now two clusters connected to Devtron: 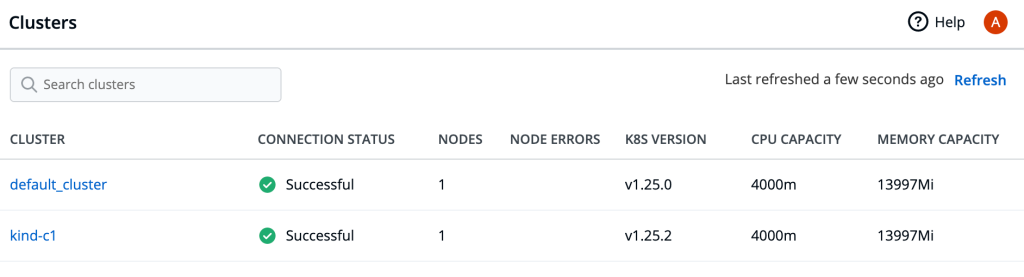 We can take a look at the details of each cluster. Here you can see kind-c1Detailed view of the cluster: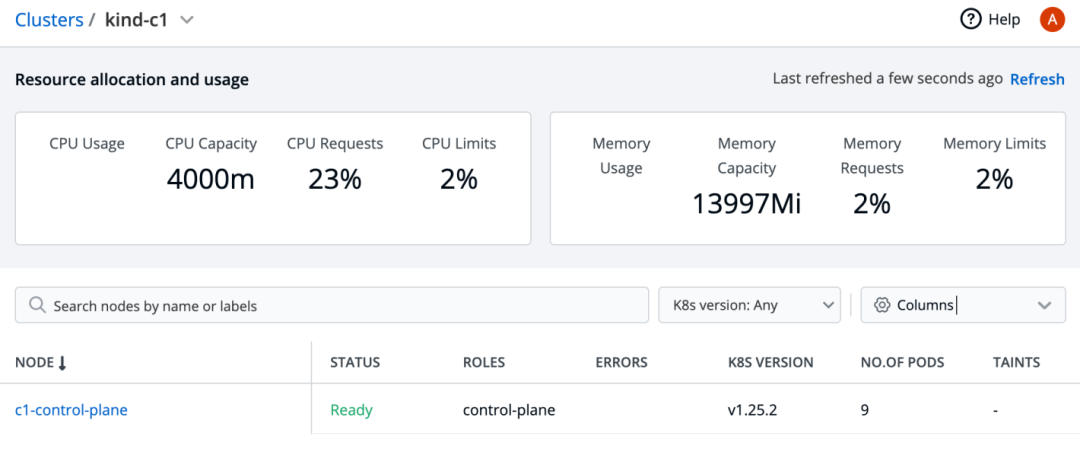 Add a custom Helm repositoryOne of Devtron's most important features is support for Helm charts. By default, there are several Helm repositories available in Devtron, including bitnamiorelastic, you can also add custom repositories. I'm using my own Helm repository here, which contains diagrams for deploying Spring Boot applications. I've put it on GitHub:
Our chart name is spring-boot-api-app, the latest version is0.3.2。 In order to add a custom repository in Devtron we need to enter again Global Configurationspart. then go to Chart repositoriesmenu item and clickAdd repositorybutton. As shown below, I added a new repository piomin。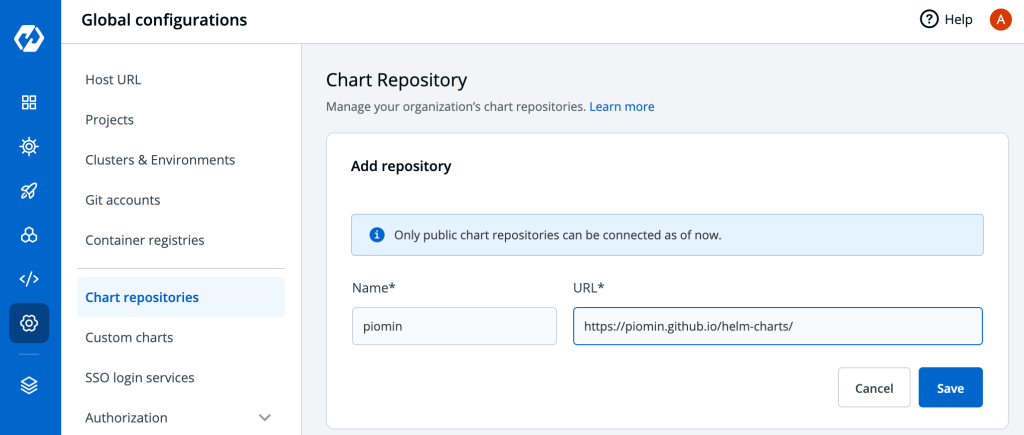 After creating the repository you can go to Chart Storesection to verify that the new chart is available.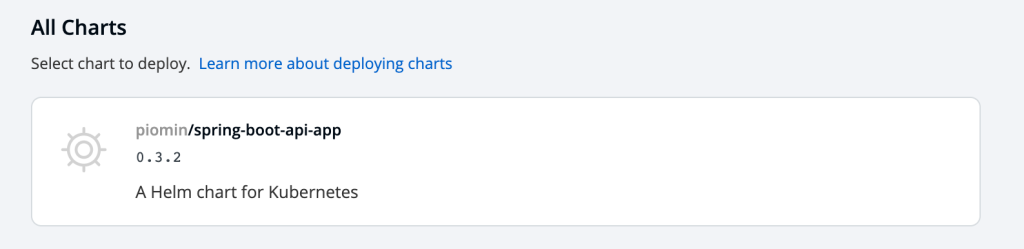 Deploy Spring Boot applications using DevtronNow we can get to the most important part of the practice: application deployment. Our sample Spring Boot application is located in the following repository on GitHub:
This is a simple REST application written in Kotlin. It exposes some HTTP endpoints for adding and returning people, and uses in-memory storage. This is Spring @RestController:@RestControllerLet's say we are developing the latest version and want to deploy it on K8S to perform some development testing. In the first step, you will build the application locally and use the Jib Maven plugin to push the image to the container registry. This is the required configuration: <plugin>Let us build the image and push it to the container registry using the following commands: $ mvn clean compile jib:build -Pjib,tomcat In addition to YAML templates, the Helm repository also contains a template for values.yaml Validated JSON schema. Thanks to this schema, we will be able to create applications from diagrams using the Devtron GUI. Let's see how it works. After clicking on a custom chart, you will be redirected to a page with detailed information. The latest version of the chart is 0.3.2. Just click the deploy button. On the next page, you need to provide the configuration of your application. The target environment exists on the main cluster local. Thanks to Devtron for Helm values.schema.json Support allows us to define all values using GUI forms. For example, you can increase the value of the change image to the latest: 1.1。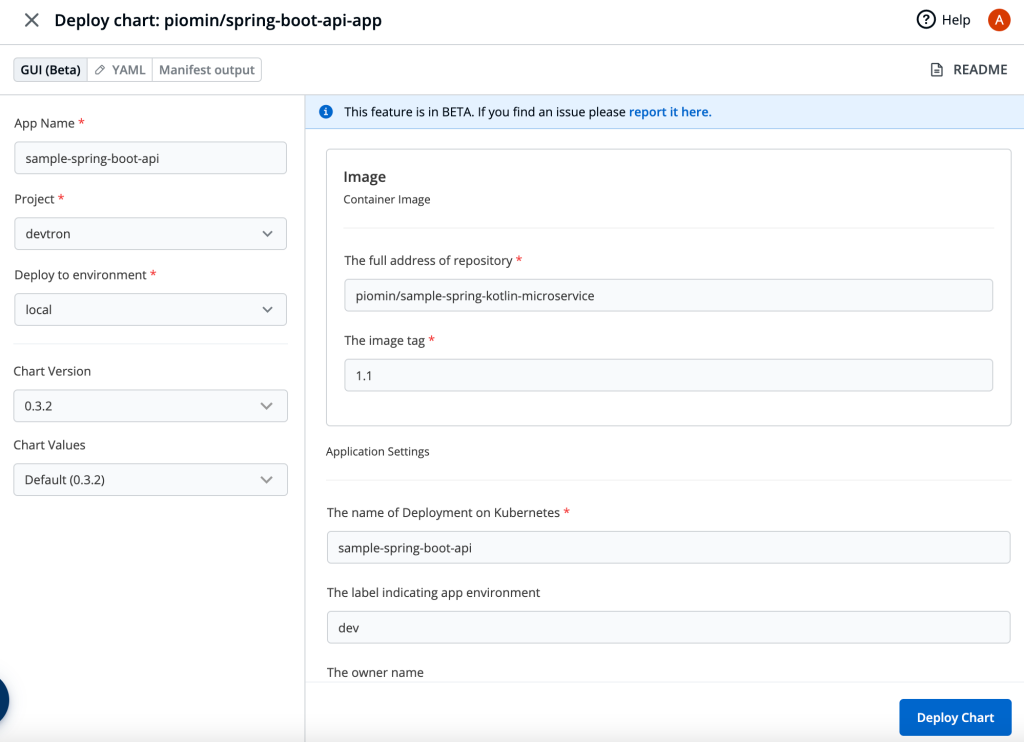 After deploying the application, we can verify its status: 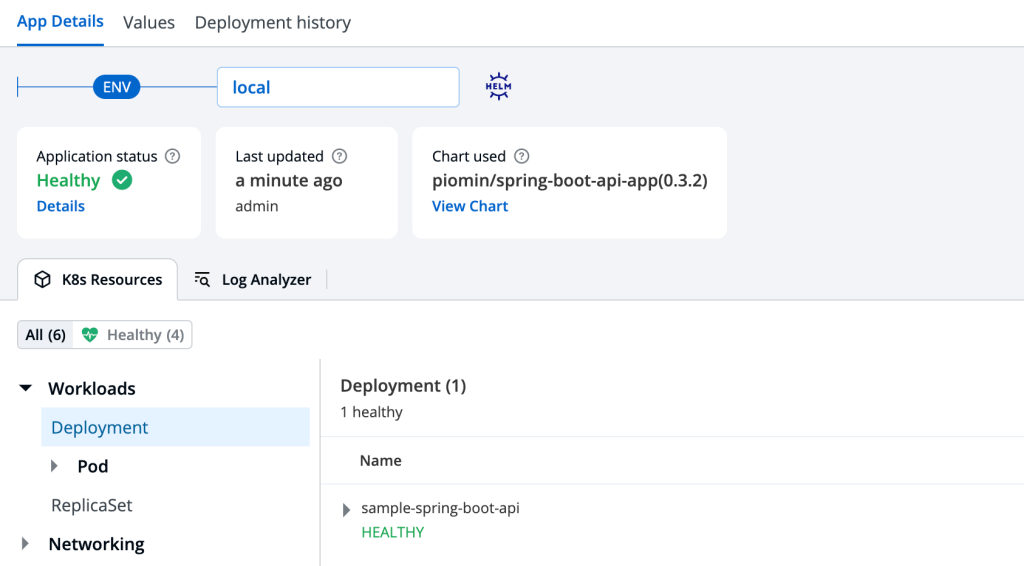 Let's make some test calls. The sample Spring Boot exposes the Swagger UI so we can easily send HTTP requests. To interact with applications running on K8S, port forwarding should be enabled for the service kubectl port-forward svc/sample-spring-boot-api 8080:8080. After executing this command, you can pass http://localhost:8080/swagger-ui.html Access address Swagger UI: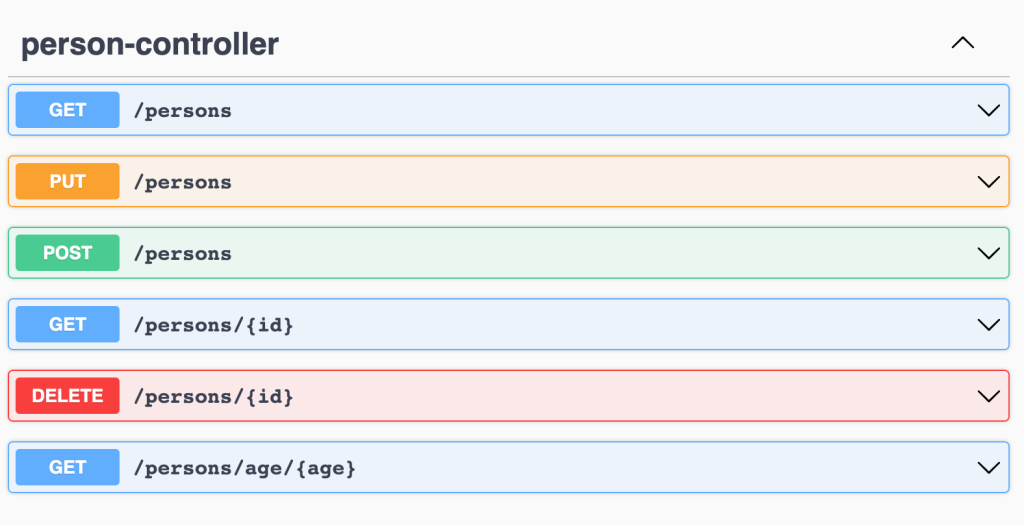 grep. The logs related to the test calls are shown below.  Deploy the application to a remote clusterNow, we deploy the sample Spring Boot application to the remote cluster. In order to do this, go to the same page as before, but instead of selecting the local environment, select remote-dev, which is related tokind-c1cluster associated.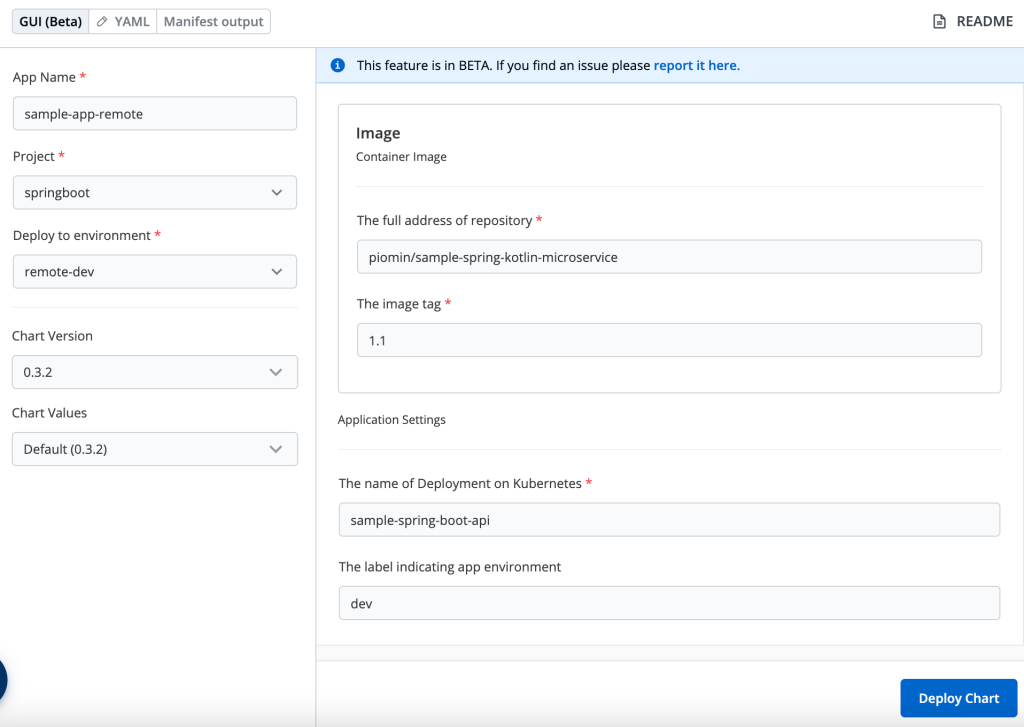 Now, there are two identical applications running on two different clusters. We can perform the same operations on the application running on the Kind cluster as on the local cluster, such as verifying its status or checking the logs. 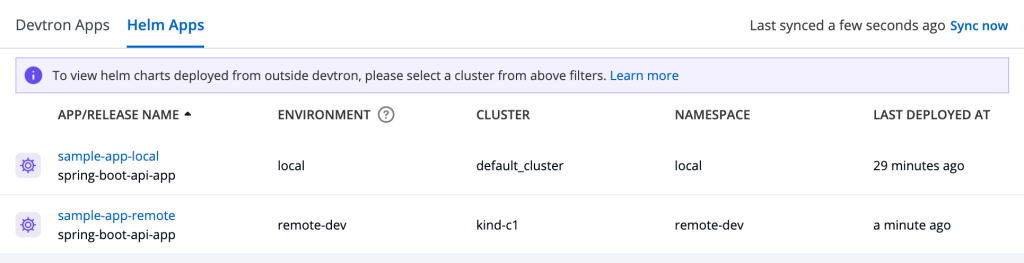 Deploy application groupLet's say we want to deploy an application that connects to a database. We can use something called Chart GroupDevtron functionality is completed in one step. Using this feature, we can put Spring Boot's Helm charts and Postgres charts in the same logical group. We can then deploy the entire group to the target environment. To create a chart group, go to the Chart Store menu and click Create Groupbutton. You should set the name of the group and select the charts that will be included. For me, it's bitnami/postgresqlchart and my custom Helm chart.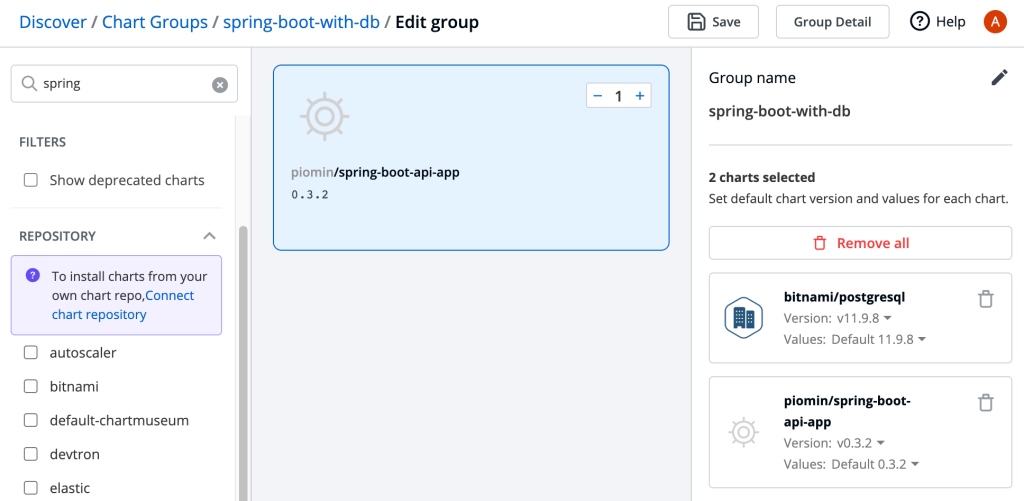 After creating the group, you will Chart StoreSee it on the main page. Now, just click on it to deploy the application. 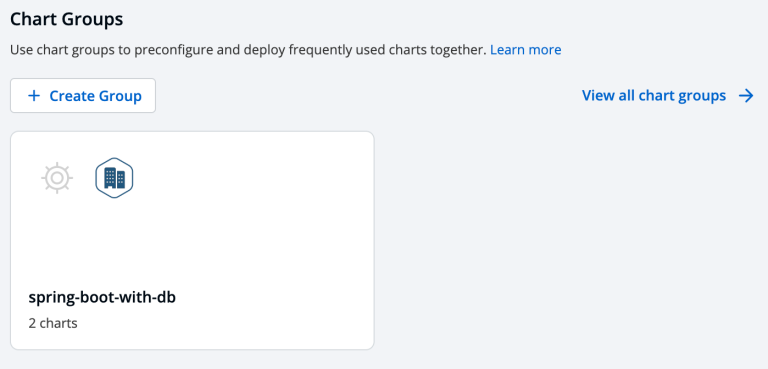 After clicking on the tile with the chart group, you will be directed to the deployment page. 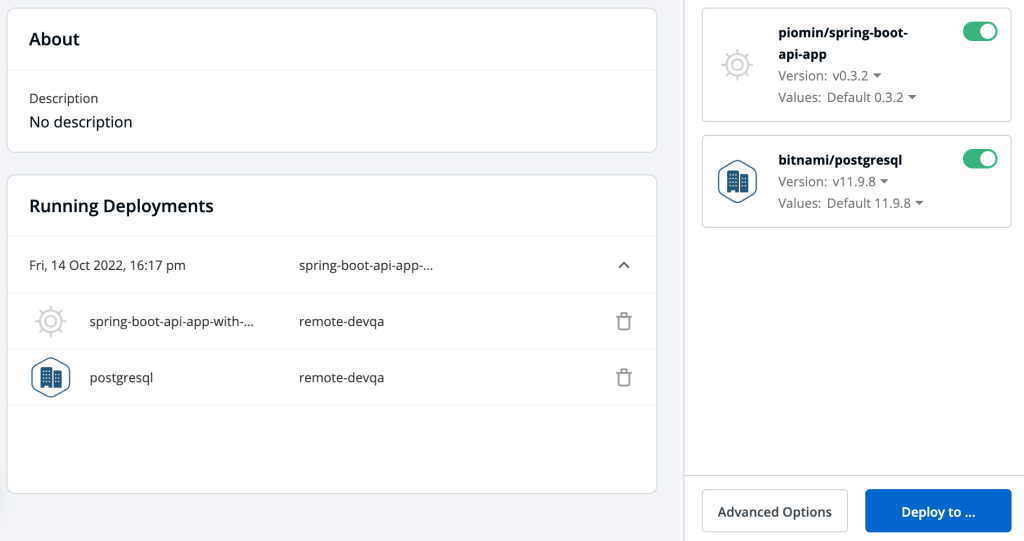 click Deploy to…After clicking the button, Devtron will redirect you to the next page. You can set target projects and environments for all member charts of the group. We will deploy them from the cluster to kind-c1clusteredremote-devqain the namespace. Among the images, you can fill in the following in my Docker account: piomin/person:1.1。By default it will try to connect to postgresDatabase on the host. The only thing that needs to be injected into the application container is the postgresql Secret (generated by the Bitnami Helm chart) postgresUser password. To inject the SecretEnvironment variables in, please use in custom Spring Boot chartsextraEnvVarsSecretparameter. Finally, let's do this by clicking Deploybutton inremove-devqaDeploy Spring Boot and Postgres in the namespace.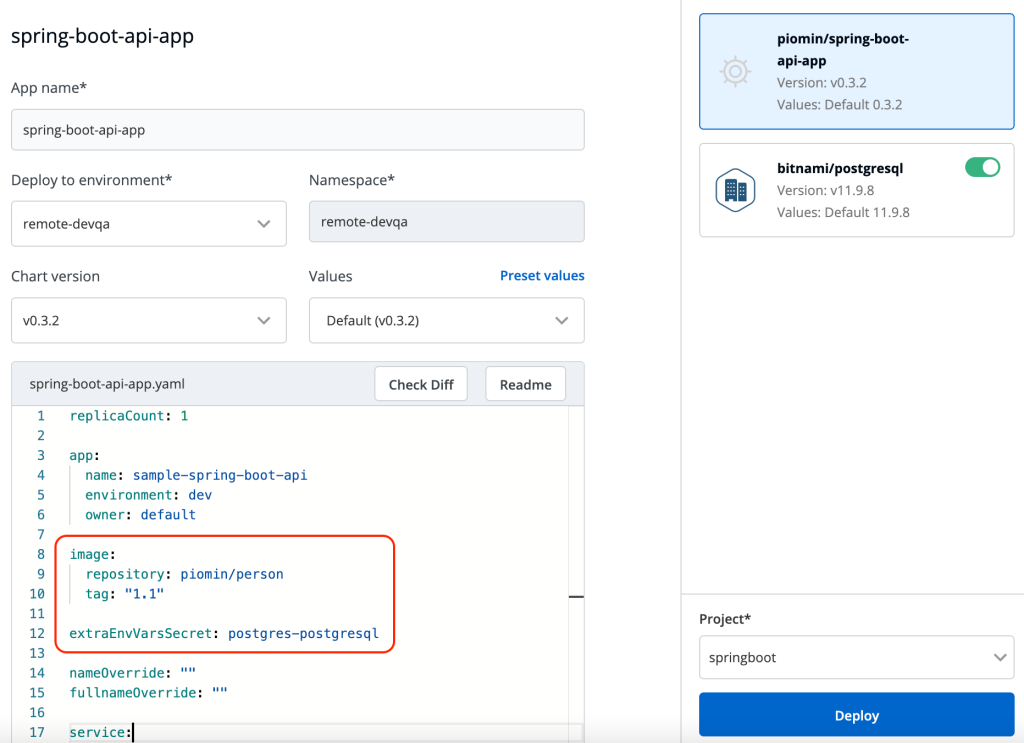 Here is the final list of deployed applications for this lab:  Summarize
 Recently, we established a WeChat group for technical communication. At present, many experts in the industry have joined the group. Interested students can join and exchange technology with us. In the "Wonderful World of Linux" public account, directly reply "Add Group" to invite you to join the group.  You might also like Click on the image below to read  How to elegantly monitor Kubernetes Pod network status  Click on the picture above to receive takeaway red envelopes for free every day from "Meituan | Ele.me"  For more interesting Internet news, follow the "Wonderful Internet" video account to learn all about it! |

|

|

|

|

|
违法和不良信息举报电话:010-6688xxxx | 举报邮箱:jubao@huoxing.com | 网上有害信息举报
xxx网络有限公司 | 粤公网安备 46902302000xxx号 | ©2021 Discuz Team. Powered by Discuz!